
ZYX

UP-1 Lambda Stylus Polisher
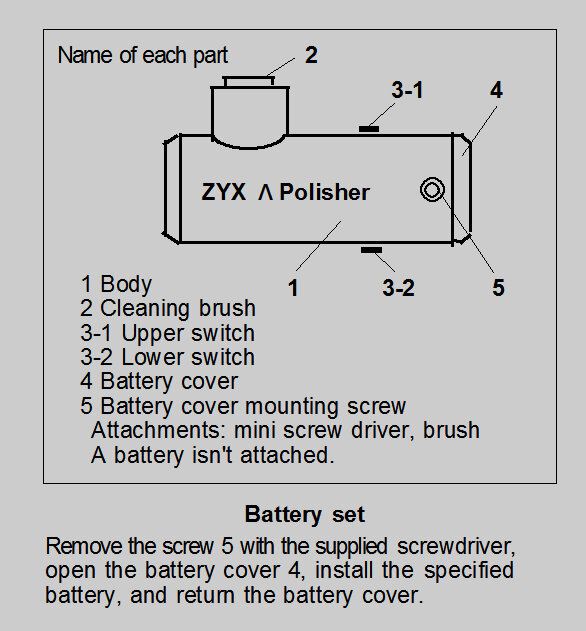
How To Use
Place the tone-arm on the armrest.
Hold UP-1 so that the cleaning / brush face is on top.
Hold the switch 3-1 or 3-2 of this UP-1 and vibrate the cleaning brush 2 and lightly press it from under the regenerative tension.
The cleaning brush 2 vibrates in three-dimensional directions, left and right, front and rear, up and down, and the needle tip is polished at the same time as removing dirt and dust adhering to the stylus tip. The driving time is several seconds to ten seconds.
Stain adhering to the root of the stylus will be easier to remove by softening with water or electrolysis water.
When finishing, move the cleaning brush downward or forward from the stylus tip and disconnect it .
Remove the dust from UP-1 using the separate brush that comes with UP-1.

TIC-12 THE INSIDE-FORCE CHECKER
INSTRUCTIONS FOR USE
Place the force checker on the trurntable platter.
Check that the stylus position is correctly set with the suitable overhang distance of the tone-arm.
Start by adjusting your anti-skating force to match the cartridge tracking force.
For example – if the cartridge tracking force is 2gm, set the anti-skate adjustment to 2.
With the turntable spinning at 33 1/3 or 45 rpm, bring the stylus / head-shell adove the flat surface and gently lower it onto the flat surface. Be ready to lift up the head-shell at once if required, to avoid unexpected large amounts of stylus skating.
Repeat and make small adjustments until the tonearm remains in the same position, ie the tonearm does not move inwards or outwards when lowered onto the flat surface.
For your accurate adjustment, in the event of changing your cartridge which has a different type of stylus from previous one, the forces generated may change.
This depends on the shape of the tip of the stylus such as spherical, elliptical, line-contact or micro-ridge type and the cartridge weight.
Therefore, in this case, it will be necessary to re-check and re-set your anti-skatingusing this anti-skating checker.